Wednesday, November 7, 2012

Quite Possibly The Best Waffle I've Ever Eaten!

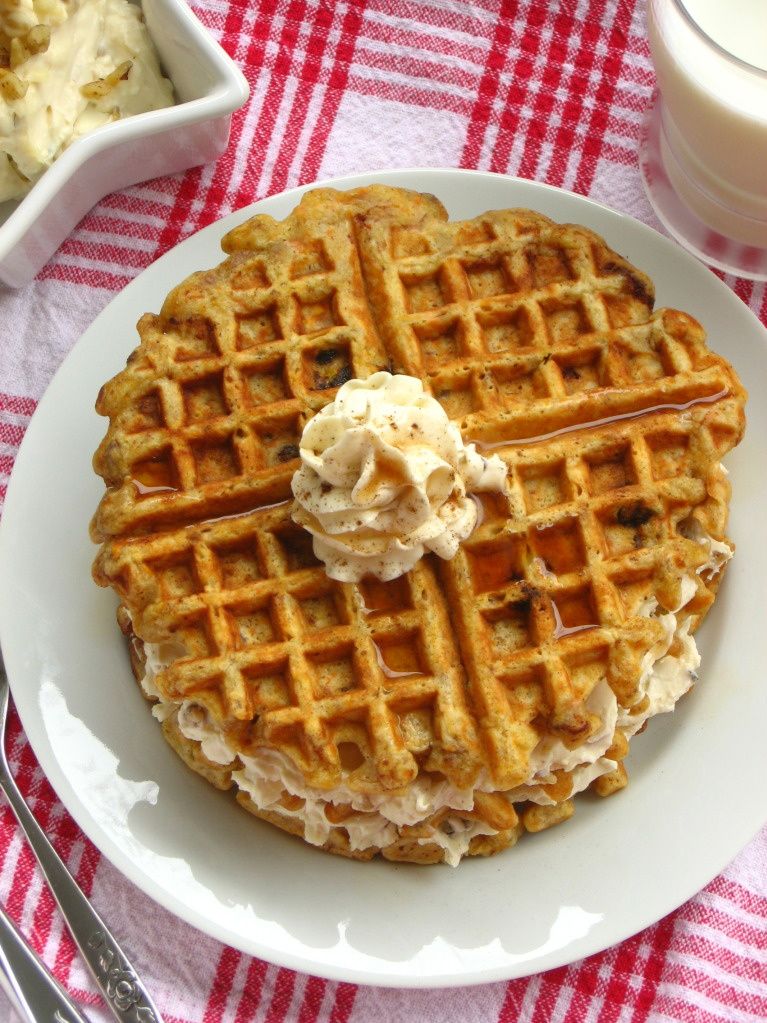
  I've had a waffle recipe I've been wanting to try for quite some time now. So why haven't I? Well, this waffle batter takes more time to make than your standard waffle recipe. This isn't something you could whip up any old morning (at least not in this crazy house), so I decided to make them for dinner. I've said this before, but breakfast for dinner is an exciting time in my household. My children are thrilled when they ask "what's for dinner" and I tell them "waffles" (or some other such breakfast favorite). So, last night I set out to make Carrot Cake Waffles. This is a recipe from Willow Bird Baking, a blogger who's recipes I have made before and loved. This waffle recipe calls for "blooming" spices into lightly browned butter. She does mention you can skip this step; DON'T! In my humble opinion, browned butter and the method of blooming the spices into it is what makes these waffles so incredibly fantastic. My children have no patience when they walk into the kitchen and see waffles on the table so I do not have any pictures of my own. Here's a picture courtesy of Willow Bird Baking just to get your mouth watering.


  I did make a couple changes to this recipe. I typically make a recipe the way it's written the first time I try it so I know if and how to alter it the next time, but there were some things about this recipe I knew I needed to change because of personal preferences.

First the batter: 
-I reduced the nutmeg to 3/4 teaspoon and allspice to 1/2 teaspoon.
-I used 3/4 cup plain yogurt, 1 cup milk and 1 tablespoon lemon juice. I did not have buttermilk and I find that making my own doesn't quite get it to the consistency of what you buy in the store. Yogurt was something she suggested so I decided to use some to bring up the acidity in the batter.
-I left out the raisins and walnuts. My husband hates raisins and I had other plans for nuts.

The topping:
-I tasted the topping after adding 4 tablespoons maple syrup and it wasn't quite sweet enough for me. That could be because I used homemade syrup. I ended up adding about 1/3 cup maple syrup to my cream cheese.
-Instead of adding the walnuts called for in the recipe I topped our waffles with homemade pralines. I had some in the freezer I had made previously. Praline-topped carrot cake waffles are phenomenal!!! The crunch and flavor from the pralines took this dish over the top.

  Make these for breakfast, make them for dinner, make them for a late-night snack, just make them!


Tuesday, October 23, 2012

Perfect Cakes Every Time!

  I must first apologize for my very long leave of absence from posting here. We are expecting the 6th member of our family in April and as with each of my pregnancies, this one has taken its' toll on me. My posts from here on out will be very inconsistent and sporadic, but I'll hope you'll check in from time to time to see what's new. That said, I'm about to share with you the trick to never having to slice the top of a cake to level it.
  In all my years of baking (I started making birthday cakes for my family at 12 years old) I have never come across this trick on any website or baking blog. Thanks to Pinterest I recently heard about "baking strips". These strips are supposed to help cakes bake evenly without having the dreaded dome in the middle. In talking to a good friend about these strips she said something that has changed my world forever: "You know you can just use strips of old cloth, soak them in water and wrap them around the cake pan?" "What?!" No, I didn't know! Are you kidding me! Why this trick isn't spread from one end of the blogosphere to the other is beyond me because it is simply brilliant. So how does it work?


  Prepare your cake as you normally do. Before placing the pan in the oven to bake, take a strip of old cloth (I cut up an old flour sack cloth I used to cover my bread while letting it rise) and soak it. Wring enough of the water out so it isn't dripping, but still pretty saturated. Wrap the cloth around the outside of the pan and tie it once to keep it in place. Put the cake in the oven to bake as usual. When done, remove cake from the oven, remove the cloth and let the cake cool 10 minutes before removing from pan to cool completely.
  I must warn you. This new-found knowledge may upset many members of your family who look forward to eating the cake tops of all your scrumptious cakes (I have a sister who is not thrilled by this), but it means a lot less work and headache for you. Just think, no more long serrated knives being used in vain attempts to get perfectly even cakes!


  Wanna know how I decorated the beautiful cake at the top of this entry? Check it out. Oh, and the inside of my cake looks exactly like the one in the tutorial, only purple.


Thursday, August 30, 2012

Raspberry Cupcakes with Brown Sugar Italian Meringue Buttercream


  Quite a title huh? I was in the market for a really tasty cupcake to celebrate the birthdays of some very special ladies. I wanted something I hadn't tried before and something not chocolate (one of the ladies isn't a chocolate eater, crazy I know). I came across a recipe from a wonderful blogger, whose blog is loaded with elegant pictures of delicious-looking food, for Raspberry Cupcakes. I did not have the xylitol called for in the recipe so I swapped it cup-for-cup for regular granulated sugar.
  I was in the mood for something more than the vanilla buttercream she frosted her cupcakes with so I began scouring the internet again and came across a recipe for Italian Meringue Buttercream. I've made this type of buttercream before (remember the Chocolate Whoopie Pies with Salted Caramel Buttercream) and loved it. Further into her frosting post she mentions variations on the buttercream, one of which is subbing brown sugar for the granulated sugar. This was it! This cupcake came out better than I could have hoped for. The cake was incredibly light and the frosting complimented it perfectly.


Thursday, August 16, 2012

A Chocolate Coma

DEATH BY CHOCOLATE CUPCAKE
 
  I have been playing around with different cupcake combinations lately. Today's venture was a Chocolate Cupcake stuffed with semi-sweet chocolate chips and topped with a Whipped Chocolate Buttercream.
  The cake recipe was courtesy of the Sweet Tooth Fairy herself, Megan Faulkner Brown. She created a Black and White Chocolate Cupcake for Food Network's "Cupcake Wars". My feelings on the cake-It was incredibly delicious, but the texture is that of a Chocolate-Chocolate Chip Muffin, not a fluffy cupcake.
  The frosting is a slight variation on a recipe also from Cupcake Wars for Whipped Chocolate Buttercream. The cake from this recipe got rave reviews but calls for coffee, which I don't drink. Until I can come up with a way to substitute coffee for another liquid without compromising flavor, I will have to stay away from this cake recipe (darn!)
  The resulting cupcake is incredibly tasty (albeit somewhat dense in the cake department), and is a definite "full-glass-of-milk-in-hand" kind of cupcake. If you're looking for something to satisfy a SERIOUS chocolate craving, this is the cupcake for you!

Whipped Chocolate Buttercream
(Slightly varied from this recipe by Michelle Spell)

2 sticks unsalted butter, at room temperature  
2 cups powdered sugar
1/2 cup cocoa powder
1 teaspoon vanilla extract
1/2 cup heavy whipping cream

   In the bowl of a stand mixer beat the butter on high, using the paddle attachment, until light and fluffy (about 2-3 minutes). Sift the powdered sugar and cocoa over the bowl and beat on low until combined. Add the vanilla and mix well. Scrape down sides and bottom of bowl and beat on high until fluffy (1-2 minutes). With mixer on low speed, drizzle in the cream. Once everything is combined, turn the mixer off and scrape down the sides of the bowl again. Replace the paddle with the whisk attachment (make sure to get all the frosting off that paddle and into the bowl!) Turn the mixer up to high speed and whip for 3 to 4 minutes, until light and fluffy.
  Spoon frosting into a pastry bag fitted with desired attachment and get to work frosting all those delicious cupcakes.

  A handy trick for filling a pastry bag-Set the bag in a tall glass (tip down). Fold the top of the bag over the top of the glass. Voila! No more struggling to fill the bag while holding it.
 

Monday, July 9, 2012

Oriental-Themed Dinner Party?!

  We love oriental food at our house. My dad spent two years in Japan in the earlier years of his adult life and thus instilled in his children a love for the food. Lucky for me my hubby has an equal love of Japanese and Chinese food.
  One particular favorite is Gyoza; a wonton wrapper stuffed with a meat and vegetable mixture that is pan-fried and then steamed. YUM! 
  We stopped in to an oriental market over the weekend where I picked up the most inexpensive and fantastic-looking wonton wrappers (these can also be found at some supermarkets, but are a more inferior quality). The craving for gyoza was then set in motion. 
  I have put together an easy (although slightly time-consuming) menu that is great for an oriental-themed dinner party, or just because. Tonight is a "just because" kind of night!
  I would encourage you to prepare much of this in advance so your work is minimal in the few hours prior to dinner.

Gyoza

Filling:
1 lb. ground beef, ground chicken, ground turkey, ground pork (or any combination of the four)
1/2 head cabbage
1 carrot
1/2 yellow onion
1/2 tsp. sesame oil
1 egg
1/2 tsp. garlic powder
1 tsp. freshly grated ginger
1 tsp. sugar
1 tsp. salt
black pepper to taste
16-oz. pkg. wonton wrappers
canola oil for frying

Egg wash:
1 egg
2 tsp. milk

  Either spend the next hour of your life finely chopping the vegetables or do like I do and shred the cabbage and carrot using the grater attachment on your food processor.
  Finely dice the onion. The food processor turns this into a liquid mess so I recommend using a knife.
  Place all ingredients in a large bowl. Using your hands, gently combine everything just until it comes together (over-working can make your meat very tough).
  In a small bowl, whisk together egg and milk to make the egg wash.
  Place approximately twenty wonton wrappers on a clean counter (working in small batches prevents the remaining wrappers from drying out). Using a small cookie scoop or spoon, scoop about 1 1/2 tablespoons of meat mixture in the middle of each wrapper.
  Using a pastry brush or your finger, brush a small amount of egg wash on two adjoining sides of the wrapper. Fold wrapper corner to corner and press to seal. Place gyoza on a parchment-lined baking sheet just overlapping each other.
   Place approximately two tablespoons canola oil in a very large frying pan that is set over medium-high heat. Place enough gyoza in the pan to fill the pan but not over-crowd it. Fry about two minutes or until golden and crispy. Flip gyoza and fry two minutes more. Pour about two tablespoons hot water into the frying pan and immediately cover with a lid. Steam two minutes. Serve with dipping sauce.

Gyoza Dipping Sauce:
1/4 c. soy sauce
1/4 c. water
1 Tbsp. rice wine vinegar
1 Tbsp. sesame oil
4 tsp. sugar

  Whisk together sauce ingredients and serve at room temperature.

  Notes: 
  -Gyoza may be made the morning of your dinner and stored on the baking sheets in the fridge until ready to cook. However, DO NOT under any circumstances cover the gyoza with plastic wrap or anything of the sort. Covering the gyoza will cause them to become a mushy mess and you will be incredibly upset after all the work you just put into these delicious little beauties!
  -As the gyoza complete the cooking process we place them in a large oven-safe serving dish in a warm oven so everyone can sit down to enjoy the meal together and no one person is left standing at the stove cooking. 


Ham Fried Rice

6 Tbsp. canola oil
3 eggs, slightly beaten
1 c. white, long-grain rice, cooked and chilled
1 chopped green onion
4 oz. ham, diced
1 c. any combination: peas, broccoli, sugar snap peas, carrots
1/3 c. soy sauce
2 tsp. chicken bouillon
2 tsp. granulated sugar

  Combine soy sauce, chicken bouillon and sugar in a small bowl.
  Place two tablespoons oil in a wok or very large frying pan set over medium-high heat and heat almost to smoking. Add beaten egg and quickly fry, stirring constantly with a wooden spoon (I have a wooden spatula that works beautifully for stir-frying). Remove from pan.
  Pour remaining oil in pan and heat again almost to smoking. Add rice and fry three minutes, stirring constantly with a wooden spoon. Add remaining ingredients (except egg) and heat through, stirring constantly. Add egg and heat through.

  Note: This dish may be made as early in advance as the night before and then reheated before serving.


Hunan Chicken Salad
(This is my version of a local restaurant's salad, which we absolutely love!)

1/2 head lettuce, shredded
1 cooked chicken breast, shredded
1 c. Maifun rice sticks (or other similar rice noodle)
2 Tbsp. finely chopped peanuts
2 Tbsp. sesame oil
1 1/4 tsp. prepared Chinese hot mustard
1 1/4 tsp. prepared Japanese wasabi
dash garlic powder
2 tsp. water
1/4 tsp. salt
canola oil for frying

  Combine sesame oil, hot mustard, wasabi, garlic powder and water in a small bowl.
  Heat canola oil in a large frying pan over medium-high heat until very hot. Place rice sticks in oil; they will puff up immediately. Flip noodles with tongs and continue cooking until they quit puffing and you can see that all noodles have cooked. Remove to paper towels.
  Just before serving, assemble all ingredients in a large serving bowl and toss to combine.


Tuesday, June 12, 2012

Just One More

  I have one more recipe to share today. This one I did not find on Pinterest, but my grandmother told me to try (which is fitting considering the name of the cookie). I have NEVER found the "perfect chocolate chip cookie" until now. Our family's favorite recipe has always been this one (the very first recipe on the page, titled "Ultimate Chocolate Chip Cookie"), which has an inclusion of oat flour in the recipe. The cookie is incredible, but sometimes you want a pure-flavored chocolate chip cookie without the taste of oats. Enter Jamie's "Grandma's Chocolate Chip Cookies". Oh my goodness! This now my go-to chocolate chip cookie recipe.


-I ended up adding 1/4 cup additional flour to the dough. 
-I also baked the cookies at 375 degrees then removed them from the oven to rest on the pan for 5 minutes before cooling completely on cooling racks. Although Jamie (from jamiecooksitup.blogspot.com) lives in Utah I still had a problem with the cookies coming out flat (a problem I typically only have when trying an out-of-staters recipe).
-I used "Private Selection" brand chocolate drops which I purchased at my local Kroger-owned store (Smith's). They are cheaper than Guittard, but are still a very large chunk of chocolate like the Guittard chips are. I love that these are extraordinarily large chips and most importantly, that even the milk chocolate drops melt (something I can't say for most milk chocolate chips). I used 3/4 bag each of milk and semi-sweet chocolate drops.


So You Don't Think I've Gone Completely Off The Grid...

  I thought I'd share some recent Pinterest successes. If you still don't know yet what the Pinterest craze is all about, check it out. You'll be so happy (and sorry) that you did. I have found some really incredible recipes and ideas through the pins my friends and family members have posted. The web address links go directly to each recipe. Hope you enjoy as much as our family has!
Follow Me on Pinterest
Click the button above to follow me as I discover lot's of new and incredible things!


Chicken Salad French Bread Sandwich-cucinafamiglia.com

This is a spectacular warm sandwich!


Spring Asparagus Pancetta Hash-smittenkitchen.com

Delicious!


 Spicy Honey Chicken-ourbestbites.com

I've made this a few times since finding it and it "WOWs" us every time!


 Bacon Wrapped Smokies with Brown Sugar and Butter-tastykitchen.com

Mind-blowingly good!


 Hawaiian Lava Flow-thecoterieblog.com

Heaven in a cup!


A delicious portable version of one of our favorite cakes!


 Homemade Nutter Butter Cookies-cookiesandcups.com

These were a home run! 

  A few notes: Because of the altitude difference, I had to add about 1/2 cup more flour. Also, I put quite a bit of frosting in between the cookies and still had enough for a double-batch of cookies. So if you want to make only one batch of cookies, cut the frosting recipe in half.


Sopapilla Bars-cucinafamiglia.com

These are crazy-good and highly addictive!

  We decided the filling would be perfect with 1 3/4 bars cream cheese.


Cashew-Caramel Cookies-marthastewart.com

Used homemade caramel...delicious!


  There are many, many, many more recipes we have tried that I could share, but thought I would start you off with just a few. Try them out, then come back and let me know what your family thought of them.


Wednesday, May 2, 2012

  I know I have not been very diligent in my posts lately. I attended a convention a couple weeks ago given by Shelf Reliance, a company for which I am an Independent Consultant. Check out my THRIVEwiththebasics blog if you'd like to learn more.
  I got past convention and was trying to get things back in order at home just in time to have my tonsils out. So, it may still be a while before you notice things happening here again because really, who wants to spend time cooking up something wonderful when they can't even eat it!
  Thanks for bearing with me.


Wednesday, April 4, 2012

Naan

  I decided to make one of our family favorites last night, Chicken Makhani. We love Indian food and that dish is a particular favorite. 
  When you visit an Indian food restaurant Naan (pronounce nahwn) is a must. There's nothing better than mopping up the delicious sauces than with a fantastic piece of flatbread. Traditional naan is slapped on the inside walls of a tandoor (clay) oven. The dough puffs and bubbles into a soft, chewy bread with a crispy exterior. Delicious!
  Since I do not own, nor do I plan to own a tandoor oven in the near future, I choose to bake my naan on a pizza stone. The results are incredibly close.

Naan

4-6 c. flour
1 Tbsp. + 1 tsp. baking powder
1 Tbsp. salt
1 Tbsp. sugar
1 1/4 c. whole milk
1/3 c. whole milk plain yogurt
1 Tbsp. vegetable oil
1 large egg, lightly beaten
4 Tbsp. salted butter, melted

  Combine 4 cups flour and remaining dry ingredients in the bowl of a stand mixer. Add milk, yogurt, oil and egg and knead 10 minutes, adding flour as needed. It is important to have a smooth, non-sticky dough.
  Preheat pizza stone in oven to 500 degrees.
  Place dough on a floured surface and allow to rest 10 minutes. Divide into 4-8 portions, depending on how big you want your naan (I like to make 4 large naan for the table to share). Roll one piece of dough into an oval about 1/3" thick. Brush the excess flour from the dough with a pastry brush. Place dough on hot pizza stone and bake 2 minutes or just until dough bubbles. Flip dough and bake 2 minutes more. Remove naan to a serving plate and brush both sides with melted butter. Serve warm.


Monday, March 26, 2012

Two New Treats

  I tried two new recipes recently; one I had reason to make and one I made for absolutely no reason at all, except that I wanted to...and that was reason enough!
   The first is a recipe for Lemon Pineapple Sherbet. We had family joining us from Arizona Sunday. Because there were a lot of us getting together, we decided we would have a turkey dinner (utilizing a turkey I had saved in the freezer from last November). Since we were having such a hearty dinner I thought it would be nice to have something light for dessert. This sherbet was an absolute hit! A note about the recipe-puree the pineapple in the blender first. The finer pieces of pineapple were much more pleasing in the sherbet. I will definitely be making this again, but maybe try orange-pineapple next time for a change; or maybe even orange-strawberry. The possibilities are endless!
  The second recipe I want to share is for the "Baked Brownie". This is a brownie from the Baked bakeshop in Brooklyn and is famous for being a rich, decadent brownie. There are a ton of blogs touting this recipe and I must agree with the conclusions-this is a delicious brownie. Give it a shot, tell me what you think.


  I'm going to let you in on a little secret. If you cut brownies with a plastic knife, you'll have zero tearing. The brownies will not clump on the knife and make a mess everywhere. You'll end up with beautiful, perfectly cut brownies.


Tuesday, March 20, 2012

Triple-Chocolate Cake Pops

  If you've been following my blog for long, you know I found encountered an obsession last year. That obsession is with cake pops. I have experimented with lot's of flavor combinations over the last several months and have only not posted them here because they never quite last long enough for a photo session, or I'm headed out the door to an event with them, or my camera is broken (the excuses go on and on). I made an excuse to make them last week and was diligent in taking photos, so I am finally posting again about cake pops!
  Here's a secret to making cake pops-when you bake a layer cake and have to cut the tops of in order to have a flat cake, place the cake tops in a gallon-size ziploc bag and place it in the freezer. As you accumulate cake tops of similar flavors keep adding them to the bag. When you're ready to make cake pops simply whip up a batch of your favorite frosting (or buy the pre-made stuff at the supermarket) and go to town! 
  Another secret to making cake pops-homemade frosting is worth the effort! Store-bought frosting tends to give the cake pop a really dense, soggy consistency. Homemade frosting leaves the interior sort of a cake-truffle consistency. Very delicious, and well worth the time.

  Crumble the cake into a large bowl. Add just enough frosting for the cake to hold together without crumbling. Too much frosting and your centers with be a gooey mess.
  Refrigerate 30 minutes.

  Line a baking sheet with foil or use a Silpat. Using a cookie scoop, scoop mounds onto the baking sheet. Roll the mounds into round balls. 

  When all the cake balls have been formed, cover the baking sheet with plastic wrap and place in the freezer for at least 3 hours or over-night.
  Dip sucker sticks in a small amount of melted chocolate (I buy dipping chocolate, but you can use chocolate chips and add shortening to it to thin it enough to use for dipping-about 1 Tbsp. shortening/2 cups chips). Push the stick about 2/3 of the way into the cake ball. Dip cake balls in chocolate and immediately into toppings (if using). Note: You can buy nifty little cake pop holders that hold them upright while they set, or you can go the cheap route and cover styro-foam blocks with foil (to catch the drips).

  My most recent attempt at cake pops last week led to chocolate cake with homemade chocolate fudge frosting. I dipped 1/3 of the pops in crushed Oreos (in honor of Oreos 100th b-day), 1/3 the pops in crushed Girl's Scout Thin Mint cookies and the last third in Heath pieces. YUM!!!


  Completely assembled cake pops store great in the freezer. Simply bag each pop (you can buy sucker bags at Walmart and most craft stores) and place the bagged pops in a gallon-size freezer bag.


Friday, March 16, 2012

Tried Something New

  Pinterest is all the craze. If you haven't yet discovered "pins" and "boards" and the obsession that comes with it all, and you're a hopeless food geek (as my husband affectionately calls me), check it out.
  One "pin" circulating right now is for Cream Cheese Pancakes. This recipe is intended for those on a low or no-carb diet. Of course I couldn't just follow the directions on the recipe because as I read through the comments on her blog post there were tons of fantastic variation ideas. I decided to go with one particular idea of separating the egg yolks and whites and whipping the whites to full volume. I was rewarded for my efforts with a fantastic, fluffy pancake that was sort of a cross between a crepe and a dutch baby. The munchins and I had these as a treat last night (my bribe for being good while dad was gone) with powdered sugar, strawberries and whipped cream on top. Delicious!

Cream Cheese Pancakes

4 oz. cream cheese, softened
1 tsp. sugar
1/4 tsp. vanilla
3 eggs, divided

  In a mixing bowl, beat cream cheese until smooth. Beat in sugar and vanilla. Add one egg yolk and beat until completely smooth, scraping the sides. Add remaining yolks and beat smooth.

  In a small mixing bowl beat egg whites to full volume. Fold whites into cream cheese mixture.
  Heat a small skillet over medium-low heat; spray with cooking spray (it is very important to spray the pan with cooking spray prior to cooking each pancake). Scoop about 1/3 cup mixture onto skillet and smooth out with an off-set spatula. Cook 1-2 minutes, until pancake is soft-set then flip and cook an additional 30-45 seconds.
   Serve warm. Yields about 8-10 6" pancakes.

  Of course, my pancakes were certainly not low-carb, but they were fantastic. If you or someone you know is on a no or low-carb diet or even a gluten-free diet, these are perfect!

Thursday, March 15, 2012

Pizza Night

  Over the last couple years my home has turned into a regular pizzeria. My family loves pizza (who doesn't?) and especially loves homemade pizza (can you blame us?)
  My sister introduced us to a new recipe from Annie's Eats for Shaved Asparagus Pizza, which became the featured pizza for last week's pizza night. I made three adjustments to this recipe- I used my own pizza dough recipe, added sliced mushrooms to the pizza and created a cream cheese mixture to replace the Boursin Cheese (something you can't find in my hometown). The results: Heavenly Deliciousness!
  Tuesday night I was in the mood to try another new-to-our-home pizza recipe (No, we don't typically have pizza every week. Weekly pizza night...not a bad idea though!) There is a restaurant just 25 minutes from our home that my husband and I love. They feature wood-oven pizzas on their menu and our absolute favorite is the "Hawaii Five-O" pizza. Let me start by saying, I don't like Hawaiian pizza. Pineapple on a pizza? Yuck! However, this one is to die for! Seriously!! Let me tell you why:

-Start with a pizza crust (my traditional recipe or your own family favorite
-Brush the entire thing with Extra Virgin Olive Oil
-Pile on the mozzarella cheese
-Top with Canadian Bacon (my favorite is "Land O Lakes" because it's nice big slices)
-Top with grilled, fresh pineapple (see my recipe for grilling pineapple here, except omit the brown sugar and grill the fruit plain) that you've diced small
-Top with crispy cooked and crumbled bacon (my addition to the original)
-Top with caramelized onions (Here's a great how-to, except replace the oil with butter. Trust me!)
-Top with crushed macadamia nuts (Unless you have some horrible macadamia nut allergy, trust me on this one and just go with it.)
-Drizzle with Teriyaki Sauce (I found this fantastic Teriyaki Glaze recipe. I doubled the brown sugar though, and cut the recipe by half.)

  I have to brag now and say how incredibly impressed I was with my ability to re-create this delicious pizza. My husband is now requesting it for our next pizza night!


Pizza/Breadstick Dough

2 c. warm Water (101-105 degrees)        2 Tbsp. Oil
2 Tbsp. Yeast                                         2 tsp. Salt
4 Tbsp. Sugar                                         4-6 c. Flour

Proof water, yeast, and sugar in a large mixing bowl. Add oil and salt and slowly add flour until dough pulls away from sides and no longer sticks to the bottom of the bowl; knead smooth (about 4-6 minutes). Makes 2 14-16” pizzas.
  To use as a breadstick dough simply divide dough into equal balls and shape into breadsticks. Place breadsticks on baking sheets and brush with egg wash (1 egg & 1 Tbsp. water beaten together). Bake immediately at 400 degrees for 10 minutes. Brush breadsticks with melted butter and sprinkle with garlic salt; bake until golden (about 3-6 minutes more).

Cream Cheese Blend (To replace Boursin)

4 oz. cream cheese, softened
1-2 Tbsp. milk
1/2-3/4 tsp. Italian seasoning (or combination of basil, oregano, parsley, thyme, rosemary and sage)
1 clove garlic, minced
1/4 tsp. coarse salt
1/4 tsp. fresh-ground black pepper

Blend all ingredients until smooth. You want a light consistency without it being runny.

Wednesday, March 14, 2012

Snails?!

  For ages I have wanted to try my hand at Brioche. The idea of making a rich, buttery, flaky pastry in my own home entices me. I finally got around to it last week (it takes two days you know?)
  I followed this recipe for Pain Aux Raisins and Cream Cheese Snails precisely. I will give you two major hints, though-Double the cream cheese filling and mound the pastries with it, and don't be afraid to lather the finished pastries with sugar glaze.
  Leftover pastries store nicely in an airtight container; simply zap them in the microwave for a few seconds to freshen them up.
  Although these are time-consuming, they are WELL worth the effort. They were absolutely fantastic!