Wednesday, September 11, 2013

Say Hello to The Cronut!

  A new craze is sweeping the nation and it's called the Cronut. The Cronut was developed by Ansel Dominique Bakery in NYC and is a cross between a croissant and a donut. People line up hours before the bakery opens to get their hands on the $5 beauties, and they are selling for as much as $50 on the "Black Market".
  I decided after some prodding from friends that I would try to recreate them. I'm sorry I don't have photos of the entire process, I was really just taking a shot in the dark at making them. After being so successful and having requests from many friends wanting the recipe, I decided to post it here for anyone willing to attempt these very labor intensive treats.
  I came across a recipe for danish/croissant dough that you make in a food processor rather than laminating butter into the dough (a process I have failed at, at least a half dozen times). The recipe is phenomenal and I have sworn to make chocolate-filled croissants very soon. When making this dough recipe, I "bloom" the yeast in and refrigerate the rough dough two hours. Remove it from the fridge and immediately begin the rolling out and folding process (you want to make sure your dough stays very cold. DO NOT let it ever come to room temperature). Once you get through step 3, roll the dough out one more time then fold both ends to the middle and fold it in half like a book; this doubles the number of layers you have in your final pastry. Wrap the dough in plastic wrap very tightly, then place the whole thing in a gallon size ziploc, press out all the air in the bag, seal it and place it in the fridge over-night. The next day remove the dough from the fridge, roll it out on a floured surface to 1 1/2" thick, cut out doughnuts with a doughnut cutter (I used two proportionate, round cookie cutters). Re-roll scraps and cut out as well. Place doughnuts and holes on a parchment-lined baking sheet and cover with plastic wrap that has been sprayed with cooking spray; let rise 1 1/2 hours (when the doughnuts have 45 minutes of rise time left, preheat your oven to 400 degrees). Bake doughnuts 15 minutes; immediately transfer to a cooling rack to cool completely. 
  In a large pot, pour canola oil to a depth of 4 inches and heat to 350 degrees. Fry doughnuts for about 30 seconds per side, until slightly more golden than they were previously. Remove to a cooling rack to drain. Drizzle with glaze and top with toffee crunchies (you may buy toffee bits in the store and crush them a little with a rolling pin). If desired, fill with pastry cream by injecting cream into the doughnut using a pastry bag fitted with a small round tip. Here's a fantastic pastry cream recipe.

  Doughnut Glaze:
3 Tbsp. softened butter
1 1/2 c. powdered sugar
1 tsp. vanilla
3-4 Tbsp. milk

Place all ingredients in a bowl; whisk together until smooth. 


My Cronut
The original, created by Dominique Ansel Bakery

  Not too shabby eh? I decided I need to cut them thicker next time, thus my instructions call for rolling the doughnuts out to a thickness of 1 1/2", which is much thicker than I cut them when I made these. Also, I may do twice as many folds with the original dough (prior to refrigerating over-night) to try getting more height and add more layers.

  Best of luck trying your hand at these. After all is said and done, they are WELL worth the effort. I could have devoured half the batch myself!



Wednesday, November 7, 2012

Quite Possibly The Best Waffle I've Ever Eaten!

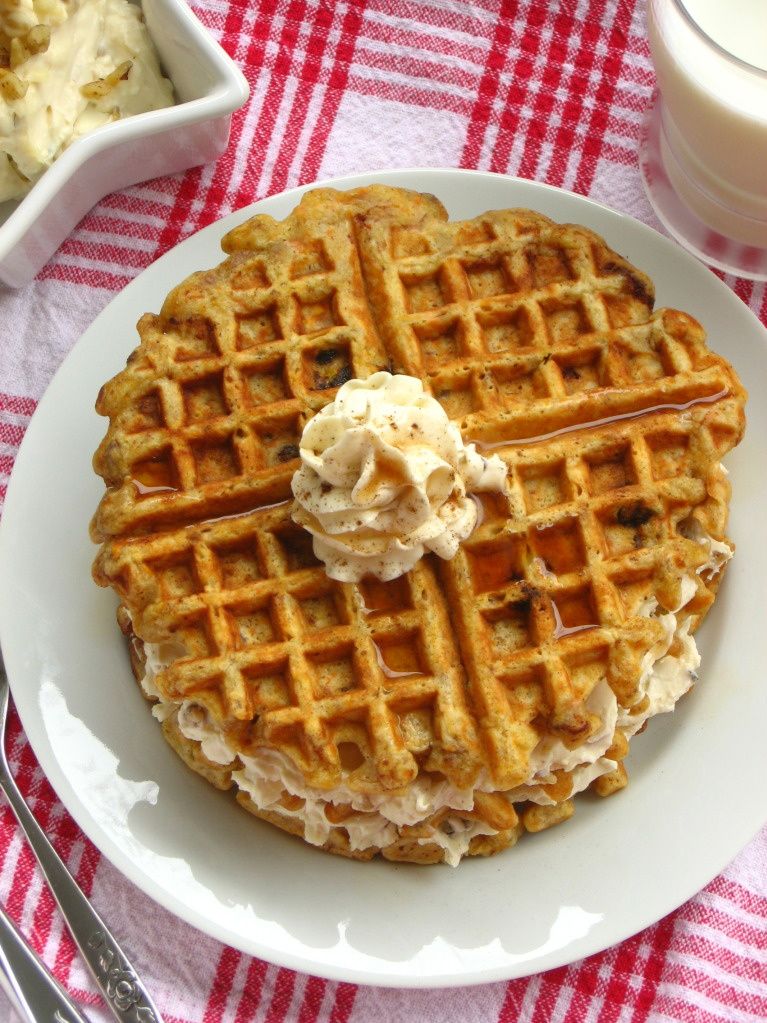
  I've had a waffle recipe I've been wanting to try for quite some time now. So why haven't I? Well, this waffle batter takes more time to make than your standard waffle recipe. This isn't something you could whip up any old morning (at least not in this crazy house), so I decided to make them for dinner. I've said this before, but breakfast for dinner is an exciting time in my household. My children are thrilled when they ask "what's for dinner" and I tell them "waffles" (or some other such breakfast favorite). So, last night I set out to make Carrot Cake Waffles. This is a recipe from Willow Bird Baking, a blogger who's recipes I have made before and loved. This waffle recipe calls for "blooming" spices into lightly browned butter. She does mention you can skip this step; DON'T! In my humble opinion, browned butter and the method of blooming the spices into it is what makes these waffles so incredibly fantastic. My children have no patience when they walk into the kitchen and see waffles on the table so I do not have any pictures of my own. Here's a picture courtesy of Willow Bird Baking just to get your mouth watering.


  I did make a couple changes to this recipe. I typically make a recipe the way it's written the first time I try it so I know if and how to alter it the next time, but there were some things about this recipe I knew I needed to change because of personal preferences.

First the batter: 
-I reduced the nutmeg to 3/4 teaspoon and allspice to 1/2 teaspoon.
-I used 3/4 cup plain yogurt, 1 cup milk and 1 tablespoon lemon juice. I did not have buttermilk and I find that making my own doesn't quite get it to the consistency of what you buy in the store. Yogurt was something she suggested so I decided to use some to bring up the acidity in the batter.
-I left out the raisins and walnuts. My husband hates raisins and I had other plans for nuts.

The topping:
-I tasted the topping after adding 4 tablespoons maple syrup and it wasn't quite sweet enough for me. That could be because I used homemade syrup. I ended up adding about 1/3 cup maple syrup to my cream cheese.
-Instead of adding the walnuts called for in the recipe I topped our waffles with homemade pralines. I had some in the freezer I had made previously. Praline-topped carrot cake waffles are phenomenal!!! The crunch and flavor from the pralines took this dish over the top.

  Make these for breakfast, make them for dinner, make them for a late-night snack, just make them!


Tuesday, October 23, 2012

Perfect Cakes Every Time!

  I must first apologize for my very long leave of absence from posting here. We are expecting the 6th member of our family in April and as with each of my pregnancies, this one has taken its' toll on me. My posts from here on out will be very inconsistent and sporadic, but I'll hope you'll check in from time to time to see what's new. That said, I'm about to share with you the trick to never having to slice the top of a cake to level it.
  In all my years of baking (I started making birthday cakes for my family at 12 years old) I have never come across this trick on any website or baking blog. Thanks to Pinterest I recently heard about "baking strips". These strips are supposed to help cakes bake evenly without having the dreaded dome in the middle. In talking to a good friend about these strips she said something that has changed my world forever: "You know you can just use strips of old cloth, soak them in water and wrap them around the cake pan?" "What?!" No, I didn't know! Are you kidding me! Why this trick isn't spread from one end of the blogosphere to the other is beyond me because it is simply brilliant. So how does it work?


  Prepare your cake as you normally do. Before placing the pan in the oven to bake, take a strip of old cloth (I cut up an old flour sack cloth I used to cover my bread while letting it rise) and soak it. Wring enough of the water out so it isn't dripping, but still pretty saturated. Wrap the cloth around the outside of the pan and tie it once to keep it in place. Put the cake in the oven to bake as usual. When done, remove cake from the oven, remove the cloth and let the cake cool 10 minutes before removing from pan to cool completely.
  I must warn you. This new-found knowledge may upset many members of your family who look forward to eating the cake tops of all your scrumptious cakes (I have a sister who is not thrilled by this), but it means a lot less work and headache for you. Just think, no more long serrated knives being used in vain attempts to get perfectly even cakes!


  Wanna know how I decorated the beautiful cake at the top of this entry? Check it out. Oh, and the inside of my cake looks exactly like the one in the tutorial, only purple.


Thursday, August 30, 2012

Raspberry Cupcakes with Brown Sugar Italian Meringue Buttercream


  Quite a title huh? I was in the market for a really tasty cupcake to celebrate the birthdays of some very special ladies. I wanted something I hadn't tried before and something not chocolate (one of the ladies isn't a chocolate eater, crazy I know). I came across a recipe from a wonderful blogger, whose blog is loaded with elegant pictures of delicious-looking food, for Raspberry Cupcakes. I did not have the xylitol called for in the recipe so I swapped it cup-for-cup for regular granulated sugar.
  I was in the mood for something more than the vanilla buttercream she frosted her cupcakes with so I began scouring the internet again and came across a recipe for Italian Meringue Buttercream. I've made this type of buttercream before (remember the Chocolate Whoopie Pies with Salted Caramel Buttercream) and loved it. Further into her frosting post she mentions variations on the buttercream, one of which is subbing brown sugar for the granulated sugar. This was it! This cupcake came out better than I could have hoped for. The cake was incredibly light and the frosting complimented it perfectly.


Thursday, August 16, 2012

A Chocolate Coma

DEATH BY CHOCOLATE CUPCAKE
 
  I have been playing around with different cupcake combinations lately. Today's venture was a Chocolate Cupcake stuffed with semi-sweet chocolate chips and topped with a Whipped Chocolate Buttercream.
  The cake recipe was courtesy of the Sweet Tooth Fairy herself, Megan Faulkner Brown. She created a Black and White Chocolate Cupcake for Food Network's "Cupcake Wars". My feelings on the cake-It was incredibly delicious, but the texture is that of a Chocolate-Chocolate Chip Muffin, not a fluffy cupcake.
  The frosting is a slight variation on a recipe also from Cupcake Wars for Whipped Chocolate Buttercream. The cake from this recipe got rave reviews but calls for coffee, which I don't drink. Until I can come up with a way to substitute coffee for another liquid without compromising flavor, I will have to stay away from this cake recipe (darn!)
  The resulting cupcake is incredibly tasty (albeit somewhat dense in the cake department), and is a definite "full-glass-of-milk-in-hand" kind of cupcake. If you're looking for something to satisfy a SERIOUS chocolate craving, this is the cupcake for you!

Whipped Chocolate Buttercream
(Slightly varied from this recipe by Michelle Spell)

2 sticks unsalted butter, at room temperature  
2 cups powdered sugar
1/2 cup cocoa powder
1 teaspoon vanilla extract
1/2 cup heavy whipping cream

   In the bowl of a stand mixer beat the butter on high, using the paddle attachment, until light and fluffy (about 2-3 minutes). Sift the powdered sugar and cocoa over the bowl and beat on low until combined. Add the vanilla and mix well. Scrape down sides and bottom of bowl and beat on high until fluffy (1-2 minutes). With mixer on low speed, drizzle in the cream. Once everything is combined, turn the mixer off and scrape down the sides of the bowl again. Replace the paddle with the whisk attachment (make sure to get all the frosting off that paddle and into the bowl!) Turn the mixer up to high speed and whip for 3 to 4 minutes, until light and fluffy.
  Spoon frosting into a pastry bag fitted with desired attachment and get to work frosting all those delicious cupcakes.

  A handy trick for filling a pastry bag-Set the bag in a tall glass (tip down). Fold the top of the bag over the top of the glass. Voila! No more struggling to fill the bag while holding it.
 

Monday, July 9, 2012

Oriental-Themed Dinner Party?!

  We love oriental food at our house. My dad spent two years in Japan in the earlier years of his adult life and thus instilled in his children a love for the food. Lucky for me my hubby has an equal love of Japanese and Chinese food.
  One particular favorite is Gyoza; a wonton wrapper stuffed with a meat and vegetable mixture that is pan-fried and then steamed. YUM! 
  We stopped in to an oriental market over the weekend where I picked up the most inexpensive and fantastic-looking wonton wrappers (these can also be found at some supermarkets, but are a more inferior quality). The craving for gyoza was then set in motion. 
  I have put together an easy (although slightly time-consuming) menu that is great for an oriental-themed dinner party, or just because. Tonight is a "just because" kind of night!
  I would encourage you to prepare much of this in advance so your work is minimal in the few hours prior to dinner.

Gyoza

Filling:
1 lb. ground beef, ground chicken, ground turkey, ground pork (or any combination of the four)
1/2 head cabbage
1 carrot
1/2 yellow onion
1/2 tsp. sesame oil
1 egg
1/2 tsp. garlic powder
1 tsp. freshly grated ginger
1 tsp. sugar
1 tsp. salt
black pepper to taste
16-oz. pkg. wonton wrappers
canola oil for frying

Egg wash:
1 egg
2 tsp. milk

  Either spend the next hour of your life finely chopping the vegetables or do like I do and shred the cabbage and carrot using the grater attachment on your food processor.
  Finely dice the onion. The food processor turns this into a liquid mess so I recommend using a knife.
  Place all ingredients in a large bowl. Using your hands, gently combine everything just until it comes together (over-working can make your meat very tough).
  In a small bowl, whisk together egg and milk to make the egg wash.
  Place approximately twenty wonton wrappers on a clean counter (working in small batches prevents the remaining wrappers from drying out). Using a small cookie scoop or spoon, scoop about 1 1/2 tablespoons of meat mixture in the middle of each wrapper.
  Using a pastry brush or your finger, brush a small amount of egg wash on two adjoining sides of the wrapper. Fold wrapper corner to corner and press to seal. Place gyoza on a parchment-lined baking sheet just overlapping each other.
   Place approximately two tablespoons canola oil in a very large frying pan that is set over medium-high heat. Place enough gyoza in the pan to fill the pan but not over-crowd it. Fry about two minutes or until golden and crispy. Flip gyoza and fry two minutes more. Pour about two tablespoons hot water into the frying pan and immediately cover with a lid. Steam two minutes. Serve with dipping sauce.

Gyoza Dipping Sauce:
1/4 c. soy sauce
1/4 c. water
1 Tbsp. rice wine vinegar
1 Tbsp. sesame oil
4 tsp. sugar

  Whisk together sauce ingredients and serve at room temperature.

  Notes: 
  -Gyoza may be made the morning of your dinner and stored on the baking sheets in the fridge until ready to cook. However, DO NOT under any circumstances cover the gyoza with plastic wrap or anything of the sort. Covering the gyoza will cause them to become a mushy mess and you will be incredibly upset after all the work you just put into these delicious little beauties!
  -As the gyoza complete the cooking process we place them in a large oven-safe serving dish in a warm oven so everyone can sit down to enjoy the meal together and no one person is left standing at the stove cooking. 


Ham Fried Rice

6 Tbsp. canola oil
3 eggs, slightly beaten
1 c. white, long-grain rice, cooked and chilled
1 chopped green onion
4 oz. ham, diced
1 c. any combination: peas, broccoli, sugar snap peas, carrots
1/3 c. soy sauce
2 tsp. chicken bouillon
2 tsp. granulated sugar

  Combine soy sauce, chicken bouillon and sugar in a small bowl.
  Place two tablespoons oil in a wok or very large frying pan set over medium-high heat and heat almost to smoking. Add beaten egg and quickly fry, stirring constantly with a wooden spoon (I have a wooden spatula that works beautifully for stir-frying). Remove from pan.
  Pour remaining oil in pan and heat again almost to smoking. Add rice and fry three minutes, stirring constantly with a wooden spoon. Add remaining ingredients (except egg) and heat through, stirring constantly. Add egg and heat through.

  Note: This dish may be made as early in advance as the night before and then reheated before serving.


Hunan Chicken Salad
(This is my version of a local restaurant's salad, which we absolutely love!)

1/2 head lettuce, shredded
1 cooked chicken breast, shredded
1 c. Maifun rice sticks (or other similar rice noodle)
2 Tbsp. finely chopped peanuts
2 Tbsp. sesame oil
1 1/4 tsp. prepared Chinese hot mustard
1 1/4 tsp. prepared Japanese wasabi
dash garlic powder
2 tsp. water
1/4 tsp. salt
canola oil for frying

  Combine sesame oil, hot mustard, wasabi, garlic powder and water in a small bowl.
  Heat canola oil in a large frying pan over medium-high heat until very hot. Place rice sticks in oil; they will puff up immediately. Flip noodles with tongs and continue cooking until they quit puffing and you can see that all noodles have cooked. Remove to paper towels.
  Just before serving, assemble all ingredients in a large serving bowl and toss to combine.


Tuesday, June 12, 2012

Just One More

  I have one more recipe to share today. This one I did not find on Pinterest, but my grandmother told me to try (which is fitting considering the name of the cookie). I have NEVER found the "perfect chocolate chip cookie" until now. Our family's favorite recipe has always been this one (the very first recipe on the page, titled "Ultimate Chocolate Chip Cookie"), which has an inclusion of oat flour in the recipe. The cookie is incredible, but sometimes you want a pure-flavored chocolate chip cookie without the taste of oats. Enter Jamie's "Grandma's Chocolate Chip Cookies". Oh my goodness! This now my go-to chocolate chip cookie recipe.


-I ended up adding 1/4 cup additional flour to the dough. 
-I also baked the cookies at 375 degrees then removed them from the oven to rest on the pan for 5 minutes before cooling completely on cooling racks. Although Jamie (from jamiecooksitup.blogspot.com) lives in Utah I still had a problem with the cookies coming out flat (a problem I typically only have when trying an out-of-staters recipe).
-I used "Private Selection" brand chocolate drops which I purchased at my local Kroger-owned store (Smith's). They are cheaper than Guittard, but are still a very large chunk of chocolate like the Guittard chips are. I love that these are extraordinarily large chips and most importantly, that even the milk chocolate drops melt (something I can't say for most milk chocolate chips). I used 3/4 bag each of milk and semi-sweet chocolate drops.